
A while ago, we published the first version of the RetDec plugin for a popular open-source reverse engineering framework – Radare2. I found writing the plugin rather pleasing thanks to the modular structure of Radare2’s interface, and I decided to share the gained knowledge. With this article from our reversing tools series, I would like to start a subseries on Radare2 & Cutter plugin writing. I’ll use our RetDec plugin; it’s internals, development, and use for demonstration. This first article is going to be dedicated to the very basics – creating and registering a simple Radare2 core plugin capable of function decompilation via RetDec API. These are the backbones of our RetDec plugin and might serve you as a tutorial to create your own Radare2 core plugin.
We are going to use C++ and CMake as these are the tools used for the RetDec Radare2 plugin development.
Radare2 plugins
Radare2 provides an easy way for users to create and contribute their modules with functionality missing in the framework. For our example decompiler plugin, we need access to Radare2 core with all the settings and analysis. You can find more info about plugins in general in the Radare2 Book.
RetDec API
Since RetDec v4.0, users have had an option to decompile/disassemble files by calling API methods. We will use this feature to create a simple decompiler plugin.
RetDec’s decompilation API is quite simple. RetDec configuration object is on the input. The second argument is an optional string that will contain the decompilation output in the requested format if provided.
bool retdec::decompile(retdec::config::Config&, std::string*);Code language: C++ (cpp)The purpose of the configuration object is to provide an interface for all information required to perform decompilation. You can also pass additional information if you are sure about any aspect of a binary file data (function names, parameters, addresses, demangled names, and lot more). For the RetDec Radare2 plugin, this is significant as it enables us to extract data from Radare2 and pass it to RetDec. If you are interested in all the available options, check the RetDec documentation.
Simple decompiler plugin
In this example, we are going to create a simplified version of the existing RetDec Radare2 plugin. Firstly, we create a primitive plugin that triggers decompilation and prints the output. Such a plugin is composed of three main components. The first one is registration in Radare2. Secondly, the plugin requires a handler function for user interaction. The last part consists of decompilation itself.
Later, we improve the primitive plugin by adding context awareness, which makes it more interactive and better-looking.
Plugin registration
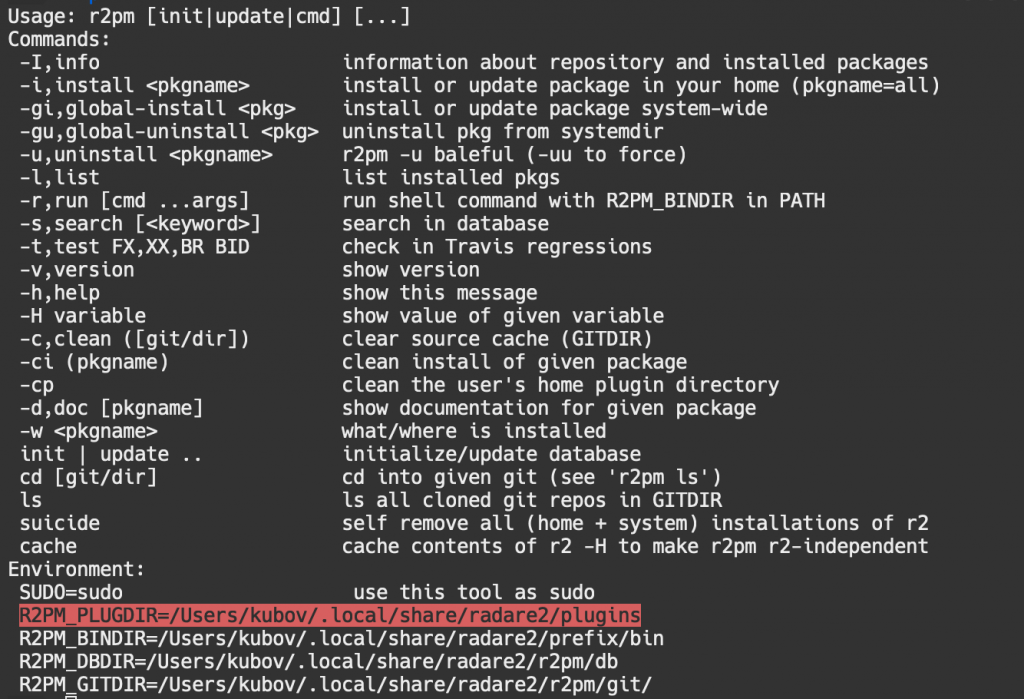
Radare2 plugins are loaded dynamically from a specific location which can be checked by calling r2pm -h (look for R2PM_PLUGDIR). Plugin registration consists of defining an object in a shared library that represents the plugin.
The following two snippets show the required info about a plugin. The first one shows a definition that provides general info about the plugin (name, author, version, etc.). The most interesting data from the second object are plugin type, compatible Radare2 version, and package information.
// Structure containing plugin info.
RCorePlugin simple_decompiler_plugin = {
	/* .name = */ "r2retdec",
	/* .desc = */ "Simple Decompiler Plugin",
	/* .license = */ "MIT",
	/* .author = */ "xkubov",
	/* .version = */ "0.0.1",
	/* .call = */ callback,
	/* .init = */ nullptr,
	/* .fini = */ nullptr
};Code language: JavaScript (javascript)
// Plugin registration in Radare2.
R_API RLibStruct radare_plugin = {
/* .type = */ R_LIB_TYPE_CORE,
/* .data = */ &simple_decompiler_plugin,
/* .version = */ R2_VERSION,
/* .free = */ nullptr,
/* .pkgname */ "simple-decompiler-plugin"
};Code language: JavaScript (javascript)Callback function
Every registered plugin must provide a callback function that Radare2 calls with a currently typed command in the console. The callback method must implement the activation process for the plugin logic based on the input character sequence. For our example, we use pdq as an activation sequence. The following snippet shows such an implementation.
#include <iostream>
#include <r_core.h>

/// Plugin activation sequence.
#define CMD "pdq"

void decompileWithRetDec(const RCore &core);

int callback(void *user, const char *input)
{
    RCore* core = (RCore*)user;
    if (std::strncmp(input, CMD, sizeof(CMD)-1) != 0)
        return false;

    try {
        decompileWithRetdec(*core);
    }
    catch (const std::exception &e) {
         std::cout << "error: " << e.what() << std::endl;
    }

    return true;
}Code language: C++ (cpp)
What is happening in the function is pretty straightforward. First, it checks the character input for the defined sequence. Then, if it finds the required prefix, decompilation is triggered. Now that we have callback we can move on to the decompilation itself.
Decompilation with RetDec
For decompilation, we must fill the required configuration parameters. For that, we use code from the following snippet.
#include <retdec/retdec.h>
#include <retdec/config/config.h>

retdec::config::Config loadDefaultConfig();
retdec::common::AddressRange currentAddressRange(
    const RCore& core);

void decompileWithRetDec(const RCore &core)
{
    auto config = loadDefaultConfig();

    config.parameters.setInputFile(core.file->binb.bin->file);
    config.parameters.setOutputFormat("plain");
    config.parameters.setIsVerboseOutput(false);
    config.parameters.selectedRanges.insert(
        currentAddressRange(core)
    );

    std::string retdecOutput;
    if (retdec::decompile(config, &retdecOutput)) {
         std::cout << "Decompilation was not successful"
                   << std::endl;
    }
    else {
        std::cout << retdecOutput << std::flush;
    }
}
Code language: C++ (cpp)
So let’s break down this a little bit. Firstly, we obtain a RetDec configuration file by calling a function loadDefaultConfig(). This function searches for configuration on a predefined place – a directory where CMake installed the plugin. Next, we fill the configuration parameters file. The main one is the input file. We obtain the path straight from the Radare2’s RCore object. For output format, we chose plain. This option tells RetDec that we are interested in plain C without any other information. Finally, the selected ranges option enables us to decompile only the function chosen in the Radare2 console.
To get selected ranges from Radare2, we use functions r_anal_get_fcn_in(), r_anal_function_min_addr() and r_anal_function_max_addr() with the current information from the Radare2 console.
retdec::common::AddressRange currentAddressRange(
        const RCore& core)
{
    RAnalFunction *cf = r_anal_get_fcn_in(
        core.anal,
        core.offset,
        R_ANAL_FCN_TYPE_NULL
    );
    if (cf == nullptr) {
        throw std::runtime_error(
            "No function at the offset: "
            + std::to_string(core.offset)
        );
    }

    auto start = r_anal_function_min_addr(cf);
    auto end = r_anal_function_max_addr(cf);

    return {start, end};
}
Code language: C++ (cpp)
CMake compilation
I have prepared a simple CMakeListst.txt with everything ready for the compilation of the code above. You can find it in the simple decompiler plugin’s Github.
Simple decompiler in action
Now we check how our simple decompiler behaves in Radare2 console. In the example below, you can see the plugin being activated by its registered command. It tries to decompile the current function but fails at first because the analysis command wasn’t executed. After functions are analyzed in Radare2, it succeeds and displays the decompiled code.
Adding interaction
As you can see, the output of our simple demo is rather dull. There is no color and no interaction with decompiled functions. To provide a more natural feel we are going to ask RetDec to produce more details so that we can generate annotations defined in Radare2.
Radare2 Annotations
An annotation is a separate piece of information that decompilers provide with a block of code. Decompiler plugins use annotations to tell what type of info they display in a particular output block or what address in binary file this block represents. This Radare2 feature for decompilers is relatively new and is currently under development. This section describes the current state.
Annotations API
Decompiler plugins are required to fill a RAnnotation object to provide annotations for Radare2. Each annotation might have one of the types defined in the following table. Apart from type, annotations have a different set of carried data shown in the right column. Annotations are defined in r_utils/r_annotated_code.h.
| Annotation type | Annotation data |
|---|---|
| R_CODE_ANNOTATION_TYPE_OFFSET | ut64 offset; // Offset in the binary file. |
| R_CODE_ANNOTATION_TYPE_SYNTAX_HIGHLIGHT | RSyntaxHighlightType type; // Type of highlight. Used for color. |
| R_CODE_ANNOTATION_TYPE_FUNCTION_NAME | char *name; |
| R_CODE_ANNOTATION_TYPE_GLOBAL_VARIABLE | char *name; |
| R_CODE_ANNOTATION_TYPE_CONSTANT_VARIABLE | char *name;ut64 offset; |
| R_CODE_ANNOTATION_TYPE_LOCAL_VARIABLE | char *name; |
| R_CODE_ANNOTATION_TYPE_FUNCTION_PARAMETER | char *name; |
For a syntax highlight annotation, Radare2 supports one of the following object types.
| R_SYNTAX_HIGHLIGHT_TYPE_KEYWORD |
| R_SYNTAX_HIGHLIGHT_TYPE_COMMENT |
| R_SYNTAX_HIGHLIGHT_TYPE_DATATYPE |
| R_SYNTAX_HIGHLIGHT_TYPE_FUNCTION_NAME |
| R_SYNTAX_HIGHLIGHT_TYPE_FUNCTION_PARAMETER |
| R_SYNTAX_HIGHLIGHT_TYPE_LOCAL_VARIABLE |
| R_SYNTAX_HIGHLIGHT_TYPE_CONSTANT_VARIABLE |
| R_SYNTAX_HIGHLIGHT_TYPE_GLOBAL_VARIABLE |
Creating function name annotation
To see how can a decompiler plugin create and set annotation for a specified token let’s consider the following code.
// Address range: 0x100000ef0 - 0x100000f2c
int64_t muchomir(char* input) {
    // 0x100000ef0
    printf("I'm a Simple Function,\n");
    printf("I See %s I Return.\n", input);
    return 0;
}Code language: C++ (cpp)
To set a function name annotation, we create the following annotations and register them using an API function.
RAnnotatedCode* code;

...

// Annotation for offset
RCodeAnnotation oa;
oa.type = R_CODE_ANNOTATION_TYPE_OFFSET;
oa.offset.offset = 0x100000ef0;
oa.start = NAME_BEGIN;
oa.end = NAME_END;
r_annotated_code_add_annotation(code, &oa);

// Annotation for highlight
RCodeAnnotation ha;
ha.type = R_SYNTAX_HIGHLIGHT_TYPE_FUNCTION_NAME;
ha.syntax_highlight.type;
ha.start = NAME_BEGIN;
ha.end = NAME_END;
r_annotated_code_add_annotation(code, &ha);

// Annotation for function name
RCodeAnnotation fna;
fna.type = R_SYNTAX_HIGHLIGHT_TYPE_FUNCTION_NAME;
fna.reference.offset = 0x100000ef0;
fna.referemce.name = "muchomir";
fna.start = NAME_BEGIN;
fna.end = NAME_END;
r_annotated_code_add_annotation(code, &ha);
Code language: C++ (cpp)
The first annotation provides interaction for click on the function name to highlight a place in disassembly. The second one tells Radare2 to use a color that is defined for function names. The third one is a special annotation that is used for the Cutter plugin.
Getting detailed info from RetDec
Plain C is not the only RetDec’s output format. You can choose JSON output when you want more deliberate info about lexical tokens in the decompiled code. When you select the JSON option, RetDec assigns an address and a type to every token. Check RetDec wiki for more information and examples.
Simple decompiler with annotations
So now that we know what info RetDec is providing and how to produce an annotation for Radare2, we can implement a simple conversion algorithm that goes through RetDec’s JSON output and creates an annotation for each object. If you are interested, you can find the implementation at the simple decompiler plugin’s Github. With code properly annotated, we can use Radare2 API calls to print the output. In the next section, I am going to demonstrate an API calls and a result they create.
Annotated decompiler in action
The first Radare2 API function we are going to examine is r_core_annotated_code_print().
R_API void r_core_annotated_code_print(
    RAnnotatedCode *code,
    RVector *line_offsets
);Code language: C++ (cpp)
The first parameter is the structure containing C code with annotations. As a second argument, you can provide binary offsets for each line of the code. These offsets can be extracted from annotations by calling r_annotated_code_line_offsets() function.
The next API we can use is r_core_annotated_code_print_comment_cmds(). It provides output in the form of Radare2 comment commands. You can execute each command, and it sets a comment with decompilation output on a particular offset.
The last API call we can use for our plugin helps us with dumping the output as JSON. You can see every annotation that has been submitted in the output. The function is r_core_annotated_code_print_json().
What’s next?
In this article, we have seen how to take advantage of RetDec API and create a very basic decompiler plugin for Radare2. We’ve created a lite version of the RetDec Radare2 plugin, currently released in version 0.2. Next time, we will extend this plugin for Cutter support and use it from a GUI.